There are times when you will have to remove your motorcycle’s seat to gain access to the battery or perform maintenance. This is a very common thing you have to do when it comes to fixing almost anything on this motorcycle. I have written an article that has an list of upgrades you can do to this motorcycle. Most of these updates require you to remove the seat, so it is a good thing to know and be comfortable doing. Below I will explain how to remove and re-install the seat.
Removing the Seat
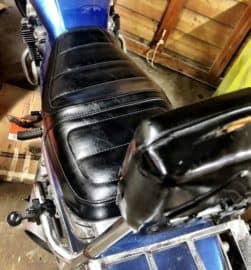
Step 1: You will have to remove the two side covers on each side of the motorcycle. These are located directly beneath the seat. This usually has the Nighthawk logo on it. (left side of the picture below) The side panels are held in place by three plastic push pins. Pull the panel straight out to avoid bending or breaking the pins.
Step 2: After you have removed the side covers you will have access to two bolts that secure the seat to the motorcycle’s frame. They are located around the middle of the seat and are circled in red. (on the right side of the picture below)
Step 3: You may have to wiggle the seat a little to get it loose before it can be completely removed from the frame. There is a tab on the front of the seat to help hold the seat down. The easiest way to remove it is by pulling the seat towards the back wheel and up. After the seat has been removed you will have access to more components of the motorcycle, like the battery. blinker relay, and air filter.
This is usually the first thing you need to do to gain access to other parts of the motorcycle. I have a article that shows you How to Replace the Petcock (fuel valve) on the gas tank. Another example is how you can Install LED Blinkers. These are just a few examples of why you would need to remove the seat.
Installing the Seat
Step 1: When re-installing to seat you need to make sure that the tab (located on the bottom front of the seat) fits into the bracket before you try to push the seat down into place. If you do it correctly, the front of the seat will be flush with the tank and the bolt holes will line up correctly.
Step 2: Screw in the two bolts that hold the seat to the frame. These do not need to be torqued down very tightly. The last thing you want to do is round off the bolt heads or ruin the threading.
Step 3: Line up the pins of the side covers and press them firmly into they rubber fittings. Make sure these are pulling pushed in, so they do not fall off while riding. You have now successfully removed and re-installed the seat!
If you are interested in what Motorcycle and gear I own, you can check it all out on the Bike and Gear page!
Saving up to buy your first (or second… or third) motorcycle can seem like a real challenge. If you are on a tight budget or do not make a lot of money, this can seem impossible. The best way I have personally been able to save money is using a app called Digit. Now I want to make it clear that I am not a financial advisor and you need to do your own extra research when it comes to how you spend your money. I just want to share how I save money when I want to buy any larger item like a motorcycle.
I was able to purchase my first motorcycle for $800. Now it was not a running motorcycle and it needed a lot of work before it was safe to ride on the street. But I was able to save up that money after a few months using this Digit app. Since this was able to help me save, which I normally have a hard time doing, I wanted to share my experience and knowelege of this App.
What is Digit?
Digit is a app you can get on PC, Apple, and Android devices that will automatically start saving small amounts of money and store it in something like a savings account. It follows the whole ‘Out of sight, out of mind’ logic and that method works for me. Once you create a account and link your bank account, it will then start slowly taking money out of your bank account and put it into the ‘Raining Day’ fund. But that is not all it can do.
Digit Goals
The next thing you can setup on it is what they call Goals. When you setup a goal you will put the amount of money you want to save and the date that you would like to have it. So, for our example we would want to create a goal named ‘Motorcycle’ and you can set the date that you would like to have the money by. On average Digit can save its users $2,200 every year. That is enough money to buy a used motorcycle off Craigslist or Facebook Marketplace.
They also have bill payment services that will automatically pay your bills for you. It does this by the same way it saves money for the Rainy Day fund and Goals. I have only used this feature to help pay my credit card. I cannot speak personally for any other bill paying features they offer. My experience with the auto pay feature has been good. Most months it has saved enough money for the minimum payment and auto pays it every month. That Way I never miss a payment, which really hurts your credit score.
They also have a overdraft protection setting that will automatically start putting money back into your checking account if it goes below a set value. This way you can avoid overdraft fees that the bank would charge you.
But what’s the Catch?
So, you are probably thinking this sounds good and all, but what’s the catch? The catch is the monthly fee to use the service. At the time of writing this it is $5 a month. I will admit I would much rather it be less than that. That means it will cost you $60 a year to use this service.
But even though I’m not the biggest fan of the price I still use this because of the piece of mind it gives me. I never have to worry about missing a credit card payment and it does a really good job at taking money out of my account without me noticing it is gone. And if I ever need that money back, I can transfer it back into my checking account.
I’m sure you have way more questions and you should be able to find the answers on their FAQ section. I just wanted to bring up a quick blurb about my strategy for saving in general and hope that this could help other people be able to save some money. Not only is it a nice way to save up to buy a motorcycle, but it will also help you have a financial cushion in case a emergency happens, like a expensive car repair.
Interested?
If you are still reading this and think this App can help you out like it did me, please consider using my referral link to sign up. If you use this link –> Sign up For Digit <– both you and I each get $5 automatically added to our accounts. (That’s FREE Money People!) Or you can just sign up without using the link. Side note – After you sign up you will get your own referral code that you can send to people you know.
My goal is to help people save up so they can afford something that has made a positive impact on my life. I believe more people need to get into motorcycling because it is a freeing activity that I find very relaxing.
If you are new to riding and want to learn more please check out my post about How to Ride a Motorcycle. I go over all the basics on what you need and how it is done.
Or if you are curious what type of gear I use and maintain, you can check it out on my Bikes & Gear page. Or you can look around the rest of the site to see if anything else peaks your interest.
As a person who has been a left hander his whole life, I feel very qualified to help answer this question. The short answer is, No, A person being left handed should not affect your ability to ride or control a motorcycle with the standard control configuration. However; the part that you will struggle with the most (when you are learning) is the opposite from what a right handed person will struggle with. I will explain down below.
Backstory about my Left handed-ness
This might not be super important, but I want to explain how I learn to do things either using my left or my right hand. I am naturally a left handed person and tend to do things with my left hand. (duh) However; my right hand is not without its talents.
When I learn a new skill, like using a can opener, playing an guitar, or riding a motorcycle, I will learn how to use that object for the hand orientation that object is setup for. Since most guitars are right handed, I learned to play a right handed guitar. Since I have had no prior experience using that device with either hand I do not find it that much more difficult to learn on my right hand.
I’m sure most left handers use their right hand to control the mouse on a computer, because that was the way you were taught to use it. I feel that learning to ride and learning the controls on a motorcycle is no different. The one problem you might have is throttle control, especially if you are not good at using your right hand at all. While right handed people will probably struggle with clutch control. I will explain below.
Clutch Control
The clutch is located on the left handle bar and controls the connection between the engine and the transmission. Being that this is on the left side, you control it with your left hand. There is this point while using the clutch that is called the ‘friction zone’. This is the zone where the clutch actually starts to connect the engine to the transmission.
This is something that you feel through the handle. Having good control on this lever will help you connect the engine and transmission smoothly. Being naturally left handed will make using this control easier for you than a right hander.
Throttle Control
The throttle is located on the right handle bar. This control increases the RPM of the engine. Basically, it adds more gas to the engine to make it spin faster. This is controlled with your right hand. Using this control, along with the clutch, is what applies power to the wheel and makes you move.
Throttle with Throttle Lock
This is the control that a left hander might have trouble with. This will apply power or speed to the motorcycle. You want the power deliverer to be as smooth as possible so the motorcycle is ‘jumpy’. This control is usually easier for a right handed people to get use to since that is their dominant hand.
Wrap-Up
To wrap everything up. You will need to have good motor control on both your hands to operate a motorcycle smoothly. It is a skill that you can learn with no issue. The only difference I noticed, was it took me more time to get use to controlling the throttle, while a right hander will probably have more trouble learning to use the clutch.
But at the end of the day you can learn to ride an motorcycle regardless of which hand you are good with. This is a skill that can be learned by anyone. and in my opinion, left handers might have a slight edge to learning this because most left handers are able to learn how to do things with there right hand since we live in a world that is dominated by right handed people.
If you are curious what type of gear I use and maintain, you can check it out on my Bikes & Gear page.
I first want to make sure I state that this post is based on my personal opinions that I have made from owning an 1984 Honda Nighthawk 650. I also do have experience riding the 250 and 750 models of this motorcycle. With that house work out of the way, lets get into this post!
I feel the Honda Nighthawk makes a great starter bike for almost everyone. The Nighthawk has a comfortable upright riding position, enough power to keep you happy for years, and is relatively cheap to obtain and maintain. It is a bike that will allow you get get through the first few years of your riding career without feeling the need to replace it. Below I will go into more detail about the different aspects of the Honda Nighthawk and what I think is good and bad about this Motorcycle.
The Good
1984 Honda Nighthawk 650 (CB650SC)
I would recommend this motorcycle to anyone who asked me what is a good beginner’s motorcycle. The reasons are the overall size of the motorcycle, engine, riding position, and price. Later in this post I will go over some of the Bad things that have come up over the years from me owning this motorcycle.
Overall Size and Engine
For the most part I will be referring to the 650 and 750 version of this motorcycle. I am 6’4″ and over 200 lbs. The smaller 250 models are still ride-able, but it struggles to do highway speed. But if you are a taller dude (or gal), most 250 motorcycles will be a bit small and will struggle to do higher speeds. That is why I got the 650 size. It was big enough to get me up to highway speed without maxing out the engine.
The weight of the motorcycle is between 450-475 lbs. It is heavier than the average sports bike, but lighter than most touring bikes. This allows the bike to handle somewhere in-between those two styles of motorcycles. It also makes it easier to move the motorcycle around while it is in the garage.
Another benefit to this style of motorcycle is the input response. When you are a new rider you are still learning how to use the controls smoothly. The inputs on this motorcycle are pretty forgiving. So if you grab to much brake or throttle, the bike will smooth out your inputs preventing the bike from being jumpy. That gives you time to correct the mistake before you try riding a newer motorcycle with more sensitive controls.
Riding Position
The riding position I would consider to be more upright. The foot controls are directly beneath you, which puts your lower body into a more sporty position. While your upper body is upright, this keeps your weight off your wrists. This helps cut down on fatigue and allows you to ride for longer times.
This position makes the motorcycle feel easy to maneuver in traffic. I have no fear lane splitting on this motorcycle here in California. I would say this motorcycle is for people that want a sporty-er feeling motorcycle that is more comfortable than a sports bike.
Price
This one will change depending on what deals you can find in your area. I was able to get my 1984 Nighthawk 650 for $800. I was able to find a 98 Nighthawk 750 near me for $2,200. When it comes to the price of parts, they are usually pretty easy to come buy and are priced fairly. The only issue I have been having, is trying to find uncommon parts for my 80’s motorcycle. Getting cables, filters, oil, brakes, lights, etc are still easy to find.
Its when you are trying to find body panels and certain mechanical components (Like shift linkages or gear position sensor) is when you will start having trouble and you will need to get creative with your repairs. Basically, E-Bay becomes your best friend for those parts. But this issue only seems to deal with the older generations of the Nighthawk. The ones from the 90’s are still easy to find.
I also want to touch on the insurance cost for owning this motorcycle. This will also change depending on where you live and how clean your driving record is. But I’m able to insure this motorcycle for ~$100 a year. Now my driving record is pretty clean and I bundled with my car insurance, so that could of helped lower the cost for me. But I just wanted to touch on this subject and let you know that this bike is pretty cheap to insure.
The Bad
Replacing the Head Bearings on the 1984 Honda Nighthawk 650
For all the good things that this type of motorcycle has to offer, there is inevitably not some good things. There have only been two major downsides to this motorcycle that I have run into. That would be finding uncommon parts and Finding someone other than yourself to fix it when it breaks down. Below I will get into more details about these two pain points.
Finding Uncommon Parts
This is probably the biggest negative I have had with this motorcycle. (This is not as big of a deal with the last generation of the Nighthawk.) If you need to replace a uncommon part for your motorcycle, you are kinda left with two options, E-Bay or local motorcycle parts store that carry old parts. Places like Cycle Gear will only have the basics like oil and tires.
To give an example: I needed to replace the whole headlight housing and after three months, I still could not find a replacement headlight that would work on my motorcycle. I could of retrofitted a universal headlight onto it, but I wanted a OEM style. I actually had to buy a headlight from a similar model from Honda and use the glass from it on my old housing. You can read an more detailed post on what I did HERE. This post explains, in detail, how I was able to use the headlight glass from the Nighthawk 700 and reuse it on my Nighthawk 650.
The overall take away from this is you need to be creative on some repairs, because you might not be able to get a proper replacement part. You might be only able to get universal parts and find a way to make them work.
Performing Repairs
If you are not comfortable with doing repairs yourself or have a friend that will help, you will be mostly out of luck. Most shops that I called told me that they would not work on my motorcycle. They told me most shops do not work on motorcycles that are older than ten years. That being said. If you bring them just your rims off the bike, they will mount the tires. So I feel like if this is a issue for you, I would stay away from motorcycles that are just old in general.
Here is a list of all the things I have repaired on my 84 Nighthawk 650. Note: I bought this motorcycle for $800 and it was not running. It was sitting in a shed for years. So I might of had to replace more things than if it was taken care of by a more loving owner. DEEP BREATH….
Petcock (Fuel Valve / Guide to that can be found HERE)
Blinker Relay
Fuse Panel Block
Oil and Filter (Duh)
Misc Engine Seals
Oil Pressure Sensor
Dented Gas Tank
Now, I know that looks like a lot, but after having to do all of this, I can say I know this motorcycle inside and out. If anything starts to go wrong with it again, I’m very good at pin pointing what the possible issues could be. I am also a person who loves knowing how things work and I don’t mind having to fix things and solving problems. I know that is not everyone’s cup of tea, but if you are this kinda person, you will enjoy how easy it is to understand the inner workings of this motorcycle.
And before we move on, I also want to make a note: Once I have made a repair, I have not had to re-repair it a second time. Most of those parts have lasted 30+ years before it had to be fixed. So there is no reason why (once it is repaired) that it will need to be replaced again for a very long time. That being said, even though I have had to fix a lot on this motorcycle, I feel like this still is a reliable motorcycle.
Conclusion
To wrap everything up, I think this is a great motorcycle for beginners. It is a nice medium sized and powered bike that will take sometime before you grow out of it. I have no plans to ever get rid of this motorcycle and I will tell anyone who will listen to me how great I think this bike is. As long as you know that you will need to perform almost all repairs and some parts will be hard to find, this motorcycle would be great for you. With what I have learned owning this bike, If I had to re-buy my first ever motorcycle, it would be a newer Nighthawk 750. The form factor is great, but having a bit more power and a bit more newer would be great. But if you are able to find an 80’s Nighthawk for a really good price, I would not turn it down.
If you are curious what type of gear I use with this motorcycle, you can check it out on my Bikes & Gear page.
If you want to install a garage door opener onto your motorcycle, you have a few options. I personally think there are two type of ways to do this. You can integrate a remote into the wiring and switches you already own or make an independent system. Mo-Door makes an aftermarket remote that follows this independent method. The one downside to the Mo-Door Motorcycle Garage Door Remote (on Amazon) is that it costs ~$80.
I really like the idea of keeping the system separate from the motorcycle’s electrical system, but I wanted to do it at half the price and mount the button to my handlebars. So I DIY’d my own version that has worked very well for me.
The garage door remote I came up with only needed a few tools to create and (in theory) you can use any garage remote, so it can work on any type of door. You just need to solder two wires to the remote and attach a handlebar mounted button. Below I will list everything I needed and how I made it.
What you Need
Here is a list of tools and supplies you will need to complete this project. Note: I only count the cost of the material towards the $40. But in this case, the tools needed are common and inexpensive. You do not need to use the exact same tools as I did, but I will link them below.
Ridingwithoutreason.com is a participant in the Amazon Services LLC Associates Program, an affiliate advertising program designed to provide a means for sites to earn advertising fees by advertising and linking to amazon.com.
Program the new garage door opener to work with your garage door. This could be different for some people, but the ones I’ve seen just have a red or purple learn button on the motor unit.
If you have this type of opener, all you have to do is push that button on the motor unit, then press the open button on the new remote. If that doesn’t work for you, consult the instructions for your opener for pairing instructions.
Step 2 – Locate the Button Connection Points
Once the opener is working as it should, we now have to break it open to get access to the main circuit board. From there, you can use a paper clip (or any piece of metal) to short the soldered leads of the button to find out which two (2) activate your door.
The best way I have found to do this is by looking at the leads right under the main button. In the remotes I have messed with, there was usually four (4) possible points. I just start testing out pairs to see which one activated my garage door.
Pins to solder wires too.
When you figure out which two leads activate your garage door, make a mark with a marker, or just make a mental note because we will be coming back to this in a later step.
Step 3 – Prepare Button and Connectors for Soldering
A quick note about the button you use. If you do not use the button I linked above. You need to make sure it is a momentary switch and not an On-Off switch. If you use an On-Off switch the garage door opener will not work correctly. It would be like holding the button down and never releasing it. The momentary switch only makes a connection while the button is being pressed. (the switch built into the garage remote is a momentary switch)
Cutting wires for soldering
To get the wires read for soldering, all we need to do is cut off the connector that came with out button. Then strip the wires for the connectors and the button wires. We also want to cut our heat shrink tubing down to the correct size if you are using it. Electrical tape will also work.
Step 4 – Solder and Heat Shrink
Solder the male connector to the wires of the button. Make sure you have your heat shrink tubing on the wires before you actually solder the connections together. After the connection cools, slide the heat shrink tubing around the exposed wires and use heat to shrink the tubing around the connection.
Wires soldered onto the board.
For the opener, tin the wires of the female cables and solder them onto the two connection points we located in Step 2. Make sure you do not put to much solder onto the board to avoid shorts.
Step 5 – Testing
To test this modification, all you have to do is press the button (before connecting the new button) and make sure your door still opens and closes. Then connect the wires from the button, press the handlebar button, and see if your garage door responds. If it does then all we have to do is assemble it.
Hole Drilled for wires to come out of garage door opener
Drill out a small hole on the side of your remote’s casing to allow the wires to stick out the side. Tie a small not in the wires and tuck that knot inside the case. This will help prevent the wires from being pulled off the board.
Assembled Garage Door Opener
Then when the remote is fully assembled, test all the functions again to make sure nothing got knocked loose in re-assembly.
Step 6 – Install onto the Motorcycle
This part is will be different for most people. But the basic of running the wires and hiding the remote are the same. The first thing you want to do is mount the button to your handlebars in a place you can reach it without taking your hand off the grip.
I found the best place is on the left side (clutch side) of the bars. This way I didn’t have to move my braking hand away to activate the button. Plus my left and is better at using controls on that side. Since the lights, blinkers, and horn are usually on that side.
I then followed the factory wiring and zip-tied the new button’s wires to those. I then fished the new wires into my headlight housing. I removed my headlight and tucked the remote into the housing and connected the wires. I then reinstalled my headlight. If you cannot put it into your headlight, find a place out of the way where it cannot get wet.
Once I had everything re-assembled, I tested all the motorcycle functions and the newly installed garage door opener. If everything stills works you are all done!
Conclusion
This mod is very simple to install and does not require you to modify the factory wiring. It is also simple to change out the remotes if you ever move and need to install a new remote. It will also save time by having the ability to control your garage door while you are on the motorcycle. You no longer have to get off the motorcycle to open the door or put in a code.
If you are curious what type of gear I use and maintain, you can check it out on my Bikes & Gear page.
I first noticed something was wrong with my 1984 Honda Nighthawk 650 (CB650SC) when there was a strong smell of fuel when the motorcycle was running. When I went down to investigate what the issue was, I noticed there was squirting fuel out of a small breather tube on the petcock itself.
Honda Nighthawk 650 Petcock
Now this leak was only happening when the motorcycle was running. In the past, I was having a fuel delivery problem that I go into more detail on my article Motorcycle Stalling while Riding. From that experience, I know starting in the 1980’s, most petcocks are vacuum actuated. If you do not know what that means I can quickly sum it up for you.
Even though you petcock has an “ON”, “OFF”, and “RES” setting, gas will not just flow through the valve. That is because there is a second valve that is always closed unless there is a vacuum being pulled from the engine. On my Nighthawk, the vacuum comes from the number two cylinder. So the petcock has two sides to it. One side is where the fuel flows through it and the second half is when air is pulled through it.
These two sides should never spill into one another. So, back to the issue, if fuel is squirting out of the air side of the petcock, the seal that keeps them separated has started to fail. There is a small diaphragm that is between the two sides. If that is torn, that is the issue.
Ridingwithoutreason.com is a participant in the Amazon Services LLC Associates Program, an affiliate advertising program designed to provide a means for sites to earn advertising fees by advertising and linking to amazon.com.
The Fix
There are pretty much just two ways to fix this issue. You can either rebuild the petcock, or just replace it with a brand new one. Both fixes will require you to remove the tank from the motorcycle, drain the fuel, rebuild/replace the petcock, and put everything back together.
For my 1984 Honda Nighthawk 650 (CB650SC), I could get either a rebuild kit or a whole new petcock. Since the price of a whole new unit was not that much more expensive, I elected to just replace the whole thing.
Petcock Rebuild Kit for Nighthawk 650
Replacing the petcock is really simple and you can do it with a few basic hand tools. I was able to replace the valve in less than an hour. Below is a semi-detailed breakdown on how I did it. I have also included pictures to hopefully make it easier to follow.
Step 1 – It’s best to get as much fuel out of the tank as possible. The emptier it is, the easier it will be to move around. Remove both side covers to gain access to the bolts that hold the seat down and remove them. (circled in red)
Remove Seat Bolts
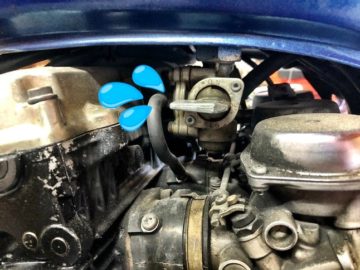
Step 2 – Disconnect the vacuum line that is connected to the petcock. If the line is old or damaged replace it. A bad line will not allow the valve to open when the engine is running.
Petcock Vacuum Line
Step 3 – Disconnect the two wire connection that is for the fuel gauge. (circled in red) And pull the wire out of the metal holder if it is connected.
Fuel Gauge Connector
Step 4 – Remove the bolt that holds the bottom of the fuel tank to the frame. To remove the tank, pull it towards the back wheel to unlock the front of the tank.
Gas Tank Bolt
Step 5 – Disconnect the fuel line that connects to the carbs. (circled in red) The tank has now been fully disconnected from the rest of the motorcycle.
Disconnect Fuel Line
Step 6 – Place the tank on top of two five gallon buckets and connect a hand vacuum pump to the port that had the vacuum line on it.(Green square) By pulling a small vacuum on that, it will let the remaining fuel drain out of the tank. (Make sure the switch is set to “RES” to get the most fuel out)
Drain Fuel with Vacuum Pump
Step 7 – Unscrew the nut that is holding the petcock to the gas tank. Once you pull it out, make sure that the old filter is pulled out. There is a chance it will not come out when you pull out the old valve.
Cleaned out Fuel Tank
Step 8 – Screw in the new petcock and make sure it is facing the right direction. do not screw it to tight, you risk ruining the threads on the tank itself.
New Petcock installed on Nighthawk 650
Step 9 – Fill the tank with enough fuel and check for leaks. If everything looks good, put the motorcycle back together and start the motorcycle. When it has been running for a few minutes, check for any more leaks.
Conclusion
Hopefully this has helped if you are having a similar issue with your motorcycle. Vacuum controlled petcocks can be the cause of a lot of fuel delivery problems when they start to get old. What my professor said back in college sums up repair perfectly. “Anything that moves, will always break” #OldBikeLife
P.S. You may want to consider replacing your fuel lines or filter while you have the tank removed and out of the way. It is also a good time to replace the spark plugs if that has to be done as well.
If you are curious what type of gear I use and maintain, you can check it out on my Bikes & Gear page.